


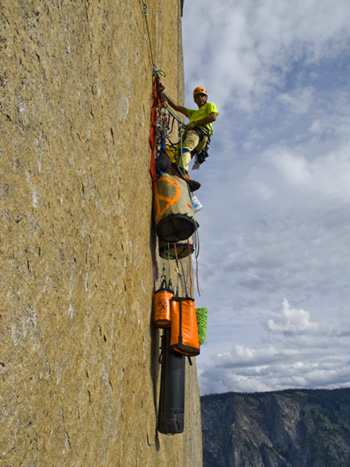
Mark Hudon hauling on the Shield
Take your ultra-thin ensolite pad that you use to keep the wind from freezing you while sleeping on the portaledge and line the interior of the bag with it. Next, fit in the water bottles and half of the canned goods (put the other half in a stuff sack). Pack the remaining items in the order that you will need to get at them. Be sure not to have any unfilled hollows or any items bulging out, as this will wear through the haul bag. Put the first aid kit, knife and a few energy bars in the zippered pouch at the top of the bag.
The sub-bag is for all the climbing gear: rack, free climbing shoes, roll of duct tape, etc. Clip a daisy chain into the main haul point and drop it down into the bag. The rack can be sorted onto different short slings that are then clipped to the daisy, making it easier to access and organize.
If you are on a steep route where the bags hang free, you can haul all this in one go. Set up a three-to-one and have your partner counterweight the bags if you're as scrawny as I am. On a slabby route, you'll need to split the weight and do two hauls until the bags shed a few pounds.
To set it up, take a master locker (which is going to get beat up) for the haul line to be tied to. Clip in two other lockers to this biner, one for the long loop of each bag. The short haul bag loop gets a non-locker, which is in turn clipped to the locker. Hang the sub-bag under one main bag and the ledge and shit bucket under the other main bag. Good to go.
To make docking and release at the anchor run more smoothly, take 20 feet of 8mm cordalette, tie a figure eight knot at the halfway point and clip this into the master locker at the bags. Use the two strands of cordalette to tie a munter hitch and clip this into the main anchor point when docking the bags. Block this munter by weaving the tail ends through the tow loaded strands and tie off with a half-hitch. Always back this up by clipping in the haul line to an anchor, snug from the bags. Now releasing the bags is a cinch, especially on overhanging or traversing pitches, although you will need to use the haul line or another rope for really big lower outs.
Once you get the bag to the top, celebrate by kicking the bags repeatedly and cursing. It'll feel good, and they're tough enough to take it.
-Sean Easton
Get news from Metolius Climbing in your inbox.

 20469 Brandis Court Bend, Oregon 97701 USA
2025 Metolius Climbing


